How i set up eclipse to develop for my AVR embedded development
How i set up eclipse to develop for my AVR embedded development
Which Eclipse version to use
I used neon for quite some time, but now switched to oxygen. It works fine.
Install the avr eclipse plugin
The archive (version 2.4.2) can be downloaded here It is installed by adding the archive as an update site in eclipse (select “archive”).
There is also an avr-plugin available from the eclipse marketplace, but it is rather old (version 2.3.4). I did not try if it works, too.

Install and configure a toolchain
I use my build script to compile a toolchain which uses the current gcc release 7.2.
The tool chain is set up in the preferences dialog of eclipse
- MSYS is installed to c:\tools\msys64
- the toolchain is generated to /opt/crosschain inside MSYS
- i use make and other unix tools like rm from the toolchain
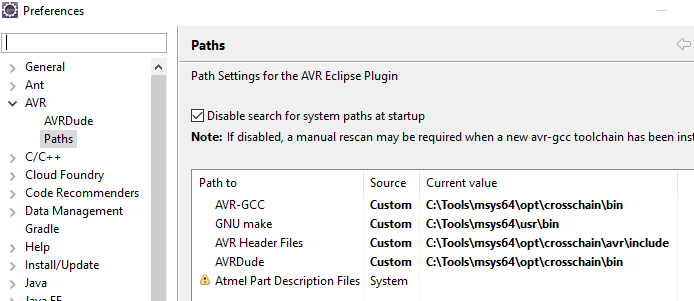
In order to make use of make, rm and avr dude from the tool chain it is necessary to set a path to the msys directory where the dlls reside.
One way is to set the path before starting eclipse. This means total control over the used tools and dlls - the best way if the search path on the computer is polluted by various tool chains, mingw installations coming with tools like git and so on.
set PATH=C:\ProgramData\Oracle\Java\javapath;c:\tools\msys64\opt\crosschain\bin;c:\tools\msys64\mingw64\bin;c:\tools\msys64\usr\bin
Set up an example project (bare metal blink on arduino mega)
-
from the menu bar select “File/New/…” and then in the dialog open the folder C/C++ and select C++ Project and click next”
-
type a name, chose avr cross target application and click finish.
-
in the new project, create a new c++ source file (right click the project, and then “new / source file”).
-
type the following code, its a tiny blink for the arduino mega, which has the led on port b, bit 7.
extern "C"
{
	#include <avr/io.h>
	#include <util/delay.h>
}

int main(void)
{
	DDRB |=  (1<<7);
	while(1)
	{
		PORTB |= (1<<7);
		_delay_ms(1000);
		PORTB &= ~(1<<7);
		_delay_ms(1000);
	}
}
-
Now set up the project properties (right click on project, and then “properties”).
-
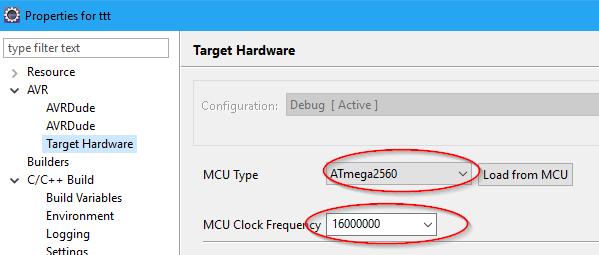
In the dialog set up the target CPU and clock. This is needed to generate the code matching our CPU and to have the delay functions of the avr lib behave properly.
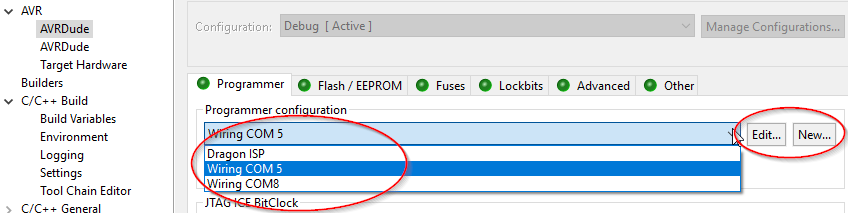
- Set up the programmer to use. If this is your first project you’ll have to set up a programmer using the new button. This opens a large dialog where you chose one of the programmer types known by avrdude. This works because you provided the path to the avrdude config file in the configuration step above. For this project use the wiring programmer type and chose the COM port that appears when the Arduino is plugged in.
- Make the project generate a hex file because we want to have something to flash..
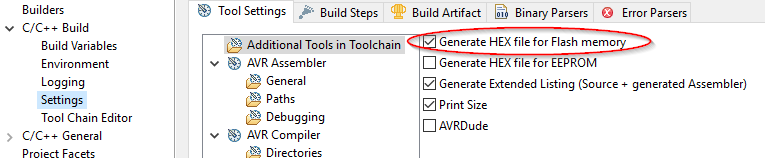
- Set up the optimizations. for the avr lib delays an optimization needs to be enabled - chose one.

-
Build the code (right click project, and then “build project”).
-
Flash the code into the Arduino. Click the “AVR” button in the tool bar, or right click the project and then “AVR/Upload Project to target device”.